Here at SaM we are going through beginning to redesign the cluster and I'm going to use this blog to document my experiences. My goal is to develop a strategy to deploy and maintain High Performance Computing clusters using open-source tools. Expect several posts in this series on topics like cluster design, provisioning, batch queues and monitoring.
The virtual test cluster
By building an HPC cluster entirely in Virtual Box I can very efficiently test software components and configurations and recover from disasters or misconfiguration in a safe and, more importantly, reproducible environment.
I this post I will describe the 3 Core VMs that will for my HPC cluster and walk through how I configure them. These 3 VMs are the only systems where I will install and configure the operating system by hand. Login nodes and compute nodes will be provisioned later and in an automated fashion. The Core VMs are
Host software requirements
The host machine (laptop, desktop, etc.) is where Virtual Box will be running. I've used both my MacBook Pro (13-inch Late 2011; 8 GB RAM; Core i7 4 hyperthreads) and my linux desktop (Intel E5507 4 hyperthreads, 12 GB RAM, Ubuntu 14.04). Running the Core VMs listed above simultaneously on each of these systems has posed no performance issues.
VirtualBox networking
When I started this project getting the networks configured correctly was a major source of confusion and frustration. I will try to explain very carefully how I have the networks configured and what they are intended to do.
Each of the three Core VMs will connect to three independent networks. They are described here.
The virtual test cluster
By building an HPC cluster entirely in Virtual Box I can very efficiently test software components and configurations and recover from disasters or misconfiguration in a safe and, more importantly, reproducible environment.
I this post I will describe the 3 Core VMs that will for my HPC cluster and walk through how I configure them. These 3 VMs are the only systems where I will install and configure the operating system by hand. Login nodes and compute nodes will be provisioned later and in an automated fashion. The Core VMs are
- ldap
Many HPC sites use LDAP for user authentication and I will demonstrate a very basic system. - vault
This my shared file system for the cluster. Typically, HPC clusters employ NFS or Lustre network file systems to store users' home directories, application binaries or they are used to provide fast scratch. - head
The head node will provision (boot) compute nodes and login nodes and maintain a consistent configuration across all nodes in my cluster. In future posts I will document my designs and implementations of systems to perform these tasks.
Host software requirements
The host machine (laptop, desktop, etc.) is where Virtual Box will be running. I've used both my MacBook Pro (13-inch Late 2011; 8 GB RAM; Core i7 4 hyperthreads) and my linux desktop (Intel E5507 4 hyperthreads, 12 GB RAM, Ubuntu 14.04). Running the Core VMs listed above simultaneously on each of these systems has posed no performance issues.
- I'm currently using VirtualBox 4.3.20. It is also necessary to install the Virtual Box Extension Pack. We will need it for a later post.
VirtualBox networking
When I started this project getting the networks configured correctly was a major source of confusion and frustration. I will try to explain very carefully how I have the networks configured and what they are intended to do.
Each of the three Core VMs will connect to three independent networks. They are described here.
- internal (10.201.x.x)
This network will be used for all communication between VMs. As I will show in a later post the compute nodes, which are the deepest part of my cluster, will only connect to the internal network.
- NAT (10.0.3.x)
This network forwards traffic from the outside world (beyond my host) into VMs. What this means is that I can "browse the web" from a VM. - host (192.168.56.x)
This network allows my host to SSH directly into a VM. It will also allow the host to view web services running on the VMs.

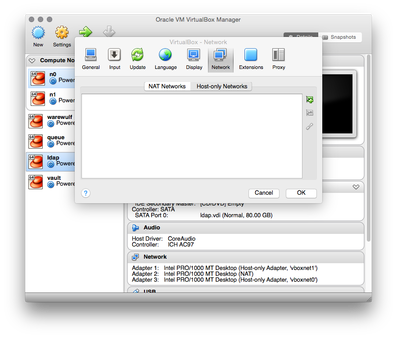
To configure the internal and host networks open the VirtualBox preference panel. It is available from the main VirtualBox menu on Mac OS X and from the File on Linux. You should see a control panel like this. I have selected Network panel and then the Host-only Networks tab.
Currently, I don't have any Host-only Networks configured. I'll make the host network first by clicking the plus icon on the right. This will create the vboxnet0 network entry. To edit the network I click on the screwdriver icon.
For the host network (vboxnet0) I set the following. I don't set the IPv6 fields.
IPv4 Address: 192.168.56.1
IPv4 Network Mask 255.255.255.0
To make the internal network click the plus icon again to generate vboxnet1 and click on the screwdriver. I set the following information.
IPv4 Address: 10.201.0.1
IPv4 Network Mask 255.255.0.0
I don't enable the DHCP services for either the host or internal networks.

The Core VMs
Now we are ready to create the three Core VMs that will form the backbone of our cluster. To begin click the New Botton on the VirtualBox main screen. I've selected 64bit Red Hat Linux and named this VM ldap. Here are the details of my VM.
Memory: 512 MB
Disk: VDI, Dynamically Allocated, 80 GB (I doubt the VM harddrive will ever get that big)
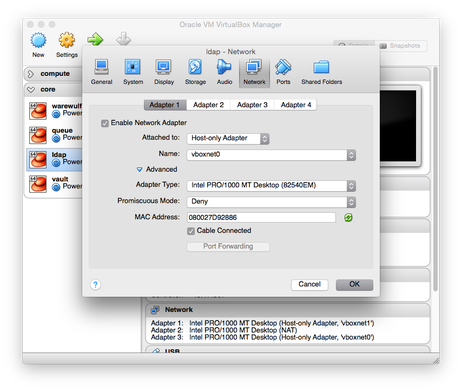
You will now have an entry in your VM list for ldap. Open the settings dialog box and click on the Network to enable the network interfaces. We are going to configure 3 Adapters for this VM. It would also be a good idea to take note of the MAC Addresses, we'll need them later. Here are my three interfaces.
Adapter 1 (internal network)
Attached to: Host-only Adapter
Name: vboxnet1
Adapter 2 (NAT network)
Attached to: NAT
Adapter 2 (host network)
Attached to: Host-only Adapter
Name: vboxnet0
 RSS Feed
